1 Why VibePlan
Every issue needs a plan, but writing a good one — phased, specific, with a realistic estimate — takes time most teams don't have. VibePlan takes a different path: press one button on the Jira issue, and an AI agent drafts the plan for you, published straight to Confluence.
A draft, not an empty doc
From the issue's requirement, the agent writes a focused, multi-phase plan — purpose, concrete tasks, and an acceptance criterion per phase. You start from something real and refine it.
The plan stays with the work
Each plan is published to Confluence and linked back to the issue it came from. The ticket, the plan, and the effort estimate sit together — no doc that drifts out of sync.
With or without a desktop
With no Mac paired, Rovo AI drafts the plan inside Jira — zero install. Pair your Mac and VibePlan runs your own AI agent for a deeper, codebase-aware plan.
Human-days and AI-days
Every plan carries two numbers — developer human-days and the AI-days an agent can accelerate — written onto the issue's own fields for planning and triage.
How it compares
VibePlan sits between an empty Confluence page and a planning meeting — and sidesteps the usual trade-offs of each.
| Approach | Who can plan | Where the plan lives | Effort visibility |
|---|---|---|---|
| Write it from scratch | Anyone — but it's slow and easy to skip | A doc disconnected from the issue | None — you estimate by gut |
| A planning meeting | Whoever is in the room | Notes that scatter afterwards | A verbal hunch, rarely written down |
| Paste the ticket into a chatbot | Anyone — but copy-paste each time | Wherever you paste the output | None, and nothing links back |
| VibePlan this app | Anyone, one click on the issue | A Confluence page linked to the issue | Human-days + AI-days on the issue |
On a paired Mac, VibePlan drafts through the AI coding agent you choose — Claude Code by default, or any CLI agent you configure (see Use the desktop app). You control the model, the cost, and the environment; there are no per-plan cloud-execution fees on the desktop path.
VibePlan is a starting point. The plan is generated from the issue's text (and, on a paired Mac, your project) — review it, refine it in Confluence, and regenerate it from your comments. It gets the structure and the first 80% on the page so you can spend your time on the judgement calls.
Who it's for
- Product managers & analysts who want a phased plan and an effort estimate from a requirement, without writing it from scratch.
- Engineers & tech leads who want an AI starting point — codebase-aware when they run their own agent — instead of an empty page.
- Delivery & project managers who want a human-day and AI-day estimate on every issue for planning and prioritisation.
- Security-conscious teams who, on a paired Mac, keep the drafting on their own machine (see Security & privacy).
2 How VibePlan works
VibePlan has a Jira app where you generate and review plans, and two ways to do the AI drafting: Rovo AI inside Atlassian's cloud (no setup), or your own AI agent on a paired Mac via the small desktop app.
VibePlan (the Jira app)
A panel on every Jira issue, plus a project settings page. Press Generate Plan, watch the draft run, and open the finished plan in Confluence — with effort estimates written onto the issue.
AppDash AI Link (the desktop app)
A free macOS app you pair once with your Jira site. Pair it to draft plans through your own AI agent (Claude Code by default) for a deeper, codebase-aware result. Not paired? VibePlan uses Rovo AI instead.
Two ways to draft a plan
| Engine | When it's used | What it can see |
|---|---|---|
| Rovo AI No setup | When no Mac is paired to the project (or you choose it). | The issue's summary and description. Runs inside Atlassian's cloud — nothing to install. |
| Your AI agent Your Mac | When a Mac is paired and an agent profile is selected. | The issue context — and, with a working directory set, your project files for a codebase-aware plan. |
The end-to-end flow
When you press Generate Plan on an issue, here is what happens:
The Rovo path is great for a fast, issue-only draft with zero install. Pairing a Mac lets the plan run through your agent and your environment — so it can read your codebase for a more grounded plan, and the drafting stays on your machine. You can start with Rovo and add the desktop later; nothing is lost.
What you need
- A Jira Cloud site with the VibePlan by AppDash app installed (ask your Jira admin if you don't see the panel on issues).
- A Confluence space you can add pages to — VibePlan publishes each plan there (see Choose a Confluence space).
- Optional, for your own agent: a Mac with the desktop app and an AI coding agent (Claude Code by default). Without these, VibePlan uses Rovo AI.
The rest of this guide goes in order: pick a space, generate and review a plan with Rovo, then (optionally) pair your Mac to use your own agent.
3 Choose a Confluence space
VibePlan publishes every plan as a Confluence page, so the one piece of setup it needs is which space to publish into. You set it once per project, on the VibePlan settings page — alongside the AI agent and (optionally) the Rovo guidance.
- Open the VibePlan settings page. In Jira, go to Project settings → Apps → VibePlan by AppDash. This is also where you pair a desktop and pick your AI agent.
-
Pick a Confluence space.
Under Confluence space, choose a space from the dropdown — it lists the spaces you can add pages to, shown as “Space name (KEY)”. This is where every plan for this project gets published.

Project settings → VibePlan by AppDash. Choose the Confluence space plans publish into and the AI agent that drafts them, then Save settings. - Save. Click Save settings. A Saved lozenge confirms it, with a “Last saved … by …” line. Until a space is saved, the Generate Plan button on issues stays disabled.
What else is on this page
- AI agent — which agent profile drafts the plans, when a Mac is paired. Leave it as the default if you're using Rovo (see Generate a plan).
- Rovo AI guidance — an optional text box that tunes how Rovo drafts plans when no desktop is paired. It comes pre-filled with a sensible default; edit it only if you want to steer the style or emphasis. (The output format is fixed; this only changes the guidance.)
- Paired devices — the desktops paired to this project, and where you pair a new one (see Pair your Mac with Jira).
The dropdown only lists spaces you can add pages to. If it's empty, ask a Confluence admin for add-page permission on a space (or create one), then reopen the settings page. If a space you previously chose was deleted or you lost access, VibePlan flags it and asks you to pick another — plans can't publish until you do.
4 Generate a plan
Plans live on Jira issues. Every issue gets a VibePlan panel where you generate, review, and track plans for that piece of work.
Open the VibePlan panel on an issue
Once your Jira admin has installed the app, each issue gains a VibePlan panel. Open any Jira issue and scroll down, past the description and fields, to find it. On an issue with no plan yet, it invites you to generate your first one.
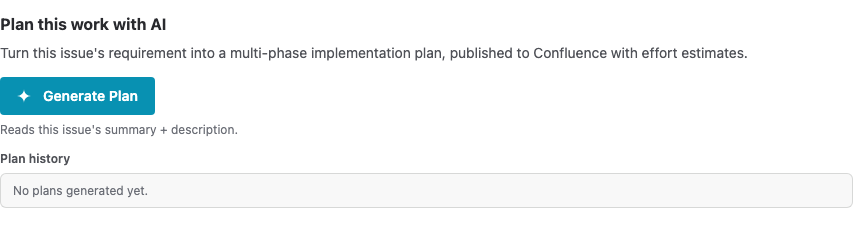
Press Generate Plan
Click Generate Plan. VibePlan reads this issue's summary and description (plus linked Jira and Confluence context) and hands them to the AI. What happens next depends on whether a Mac is paired:
With no Mac paired — Rovo AI
If no desktop is paired to the project, VibePlan offers to draft the plan with Rovo AI — Atlassian's hosted AI — right inside Jira. A short confirm explains the choice:
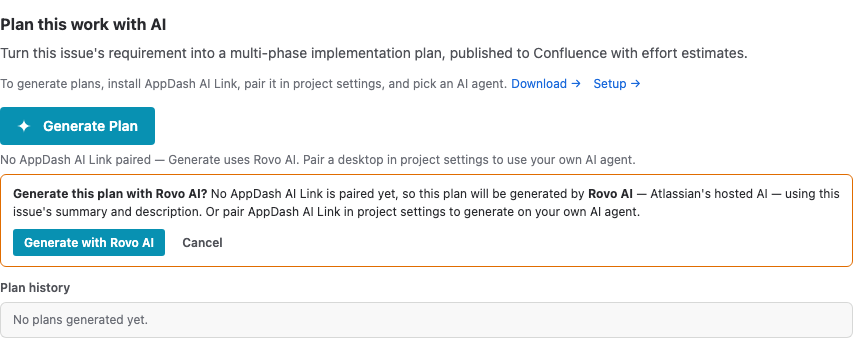
Click Generate with Rovo AI and the plan is drafted and published in a few seconds, entirely inside Atlassian. Rovo sees only the issue's text — it has no access to your codebase.
With a Mac paired — your own agent
If a desktop is paired and an agent profile is selected, Generate Plan dispatches the job straight to your Mac, where your AI agent drafts the plan. This path can read your project files (when a working directory is set) for a more grounded plan. See Pair your Mac with Jira to set this up.
Watch it draft
While the plan is being written, the panel shows a live status card:
- Queued — planning… with the note “This usually takes a few minutes.”
- Drafting your implementation plan with AI… — once the agent picks it up, with a live elapsed timer ticking beside it (and the agent's name, e.g. Running on Claude Code).
- A Stop button is available throughout — click it to cancel the generation (the plan is marked stopped, and on a paired Mac the underlying agent is halted).

A plan on your own agent has a generous timeout (30 minutes by default) and auto-stops if it exceeds it. If a draft runs past about five minutes, the panel adds a note — “Taking longer than usual — your device may be busy.” — so you know it's still working. You can press Stop at any time.
5 Review your plan
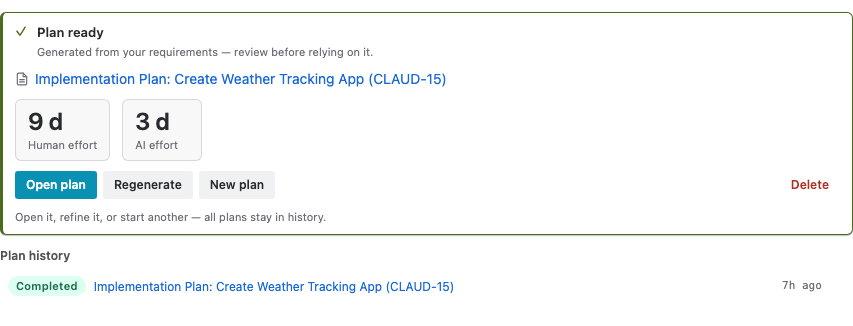
When drafting finishes, the panel shows a Plan ready card with everything you need: a link to the Confluence page, the two effort estimates, and the actions to open, refine, or replace the plan.

What's on the card
- The plan title — a link (with a document glyph) that opens the generated Confluence page in a new tab. Middle-click or ⌘-click to copy the link.
- Two effort tiles — Human effort (developer calendar-days) and AI effort (the days an AI agent can accelerate), each shown as
{n} d. The same two numbers are written onto the issue's own fields. - Actions — Open plan (the Confluence page), Regenerate (redraft in place), New plan (draft another alongside this one), and Delete.
- A Generated with Rovo AI note appears when the plan was drafted by Rovo rather than your own agent.
The published Confluence page
Click Open plan to read the full plan in Confluence. Every generated page includes:
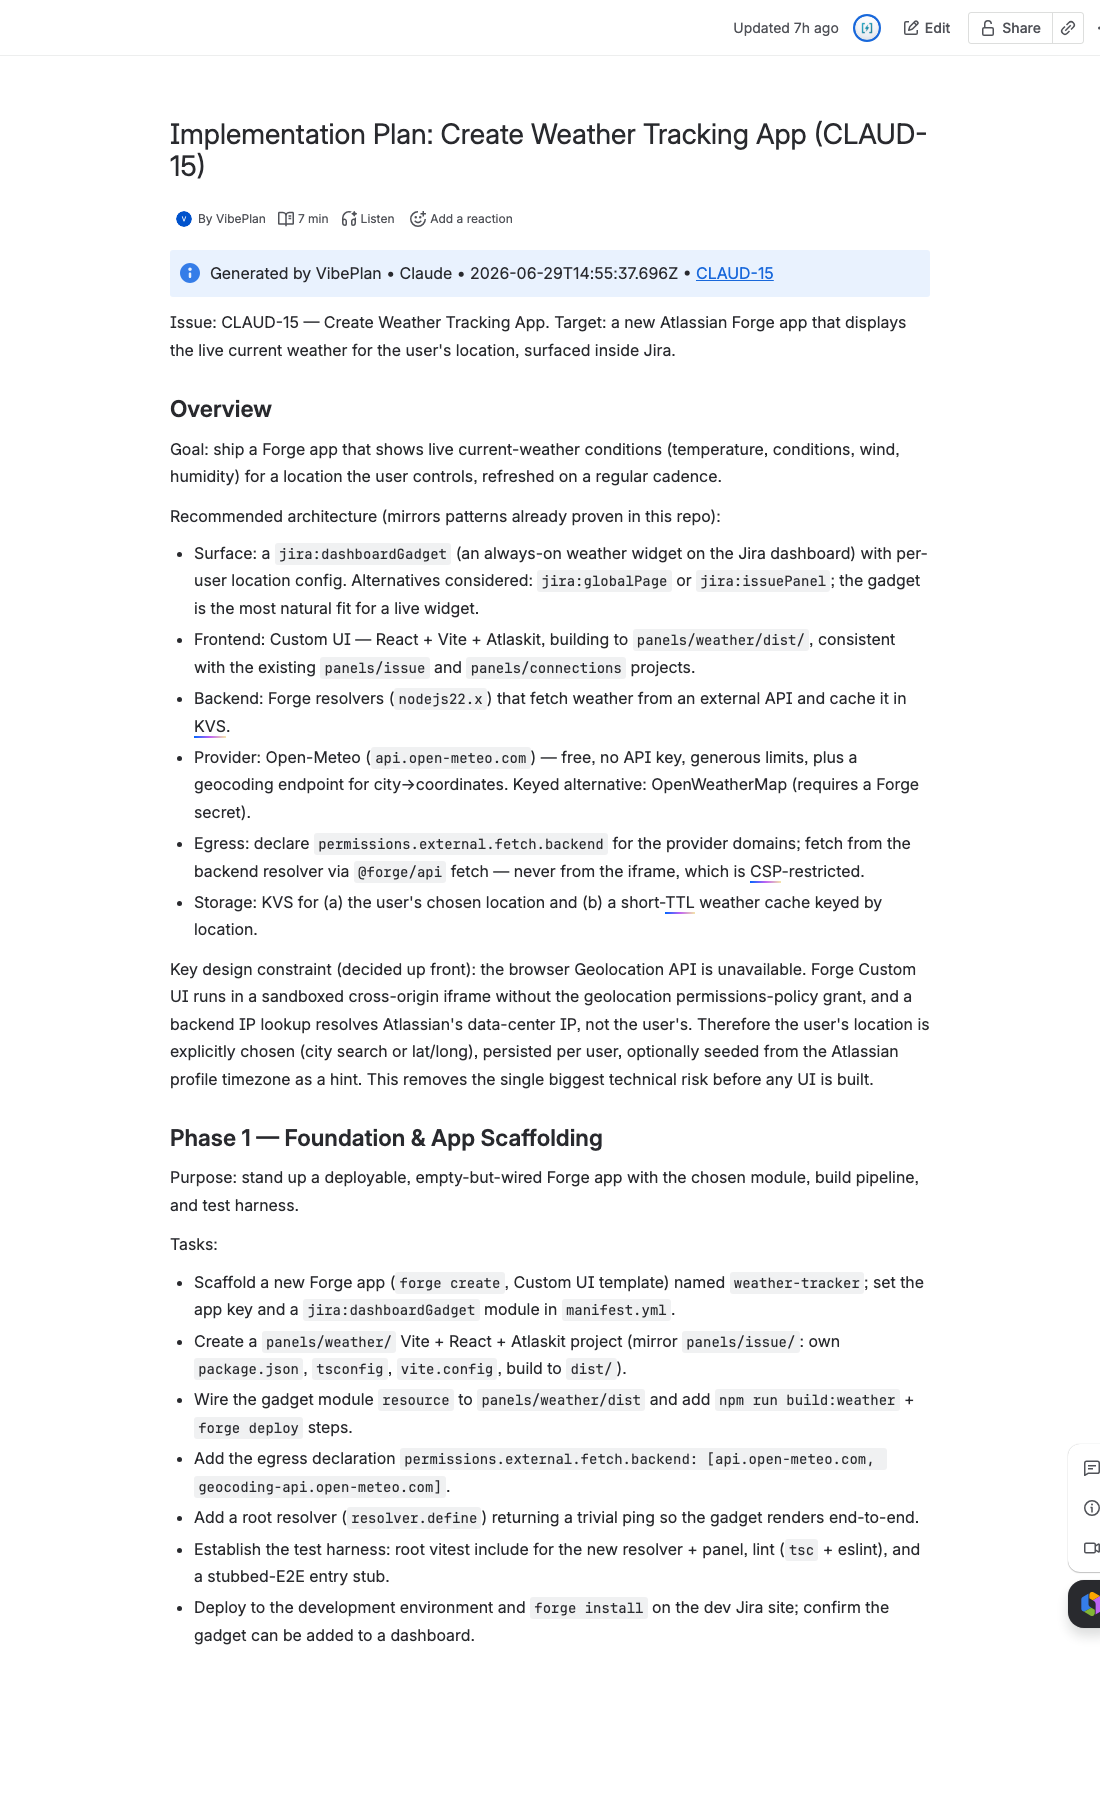
- A generation-info header — an info panel noting the plan was generated by AI, the date, and a link back to the Jira issue. It's a reminder to review the plan before relying on it.
- Phased sections — typically three to five phases, each with a one-line purpose, a short task list, and an acceptance criterion. Code snippets render as proper Confluence code macros.
- An overall effort line — the human-day and AI-day totals, matching the tiles on the panel.
- A link back to the issue — the plan is added to the Jira issue's Web links, so the issue and its plan always point at each other.
Once published, the plan is a normal Confluence page: edit it, comment on it, share it, and bring it into a meeting. When you Regenerate (next section), VibePlan reads the page's comments and folds that feedback into the new draft.
6 Manage your plans
A single issue can have more than one plan over its life — an early draft, a refined version, an alternative. VibePlan keeps them all in a plan history, and gives you three ways to move a plan forward.
Regenerate — refine in place
Click Regenerate on a ready plan to redraft it. VibePlan reads any comments on the Confluence page and incorporates that feedback, then replaces the existing page in place (the link stays the same). A short confirm explains it:
“Regenerate this plan? Comments on the Confluence page will be incorporated if present. The existing page will be replaced.”
It's the natural loop: read the draft, leave comments where it's wrong, regenerate, repeat. (With no Mac paired, regeneration runs through Rovo AI and the confirm says so.)
New plan — draft another alongside
Click New plan to generate a separate plan without replacing the current one — useful for an alternative approach or a fresh take. Both plans stay in the history with their own Confluence pages.
Plan history
Below the active plan, the Plan history lists every plan generated on this issue — newest first.
- A status lozenge — completed, running, failed, or queued / cancelled.
- The plan's title, which links to its Confluence page when one was published.
- A relative timestamp (just now, 2m ago, 1d ago).
- A delete (✕) control to remove that entry from the history.
Delete a plan
Delete removes a plan from VibePlan's tracking on the issue after a confirmation. Importantly, the published Confluence page is kept — deleting only stops VibePlan from tracking it here:
“Delete this plan and start over? This removes the plan and its Plan-history entry from this issue. The published Confluence page is kept — it just won't be tracked here anymore. You'll return to the Generate Plan form.”
If the AI drafts a plan but publishing to Confluence fails, the card explains exactly what happened and what to do — for example, you don't have permission to add pages to the selected space (pick a space you can edit), or the space wasn't found (it was deleted — choose another). Use Open settings to fix the space, then Try again. The draft isn't lost to a transient hiccup.
7 Install the desktop app optional
You can use VibePlan with Rovo AI alone — no install. Install the free AppDash AI Link desktop app when you want plans drafted by your own AI agent, on your own machine, with access to your codebase.
-
Download the app.
Open appdash.ai/download and download the latest macOS build (a
.dmgfile). You'll also find this link inside Jira — on the VibePlan settings page and in the panel's setup note (Download →). -
Install it.
Open the
.dmgand drag AppDash AI Link into your Applications folder, then launch it. On first launch macOS may ask you to confirm you want to open an app downloaded from the internet — choose Open. - Find it in your menu bar. AppDash AI Link lives in your Mac's menu bar and opens a single window with four tabs: Connections, Activity, Console, and Settings. It opens on the Connections tab.
VibePlan drafts plans (on this path) through an AI coding agent on your Mac. If you haven't already, install Claude Code (the default). The desktop app auto-detects it; you can check or change this under Settings → Agents (covered in section 9).
The desktop app is shared across AppDash products — if you already use it for VibeTest, you're already set up, and the same pairing works for VibePlan.
8 Pair your Mac with Jira
Pairing links one Jira site to your desktop app, so plans you generate in Jira can run on your Mac. You do it once per site, across two windows — the VibePlan settings page in Jira and the desktop app — confirming a short code on both so nobody can pair without your approval. Jira walks you through four stages: Generate → Send to desktop → Confirm → Connected.
- Open the VibePlan settings page in Jira. Go to Project settings → Apps → VibePlan by AppDash. The Paired devices section lists any desktops already paired to this project, and is where you pair a new one.
- Generate the pairing link in Jira. Click Pair AppDash AI Link. Jira advances to Send to desktop and shows a short user code (note it — you'll check it in step 4) and a Copy pair link button. Click Copy pair link.
-
Paste the link into the desktop app.
Switch to AppDash AI Link. On the Connections tab, click + Add Connection, paste the link into the box, and click Pair this device.
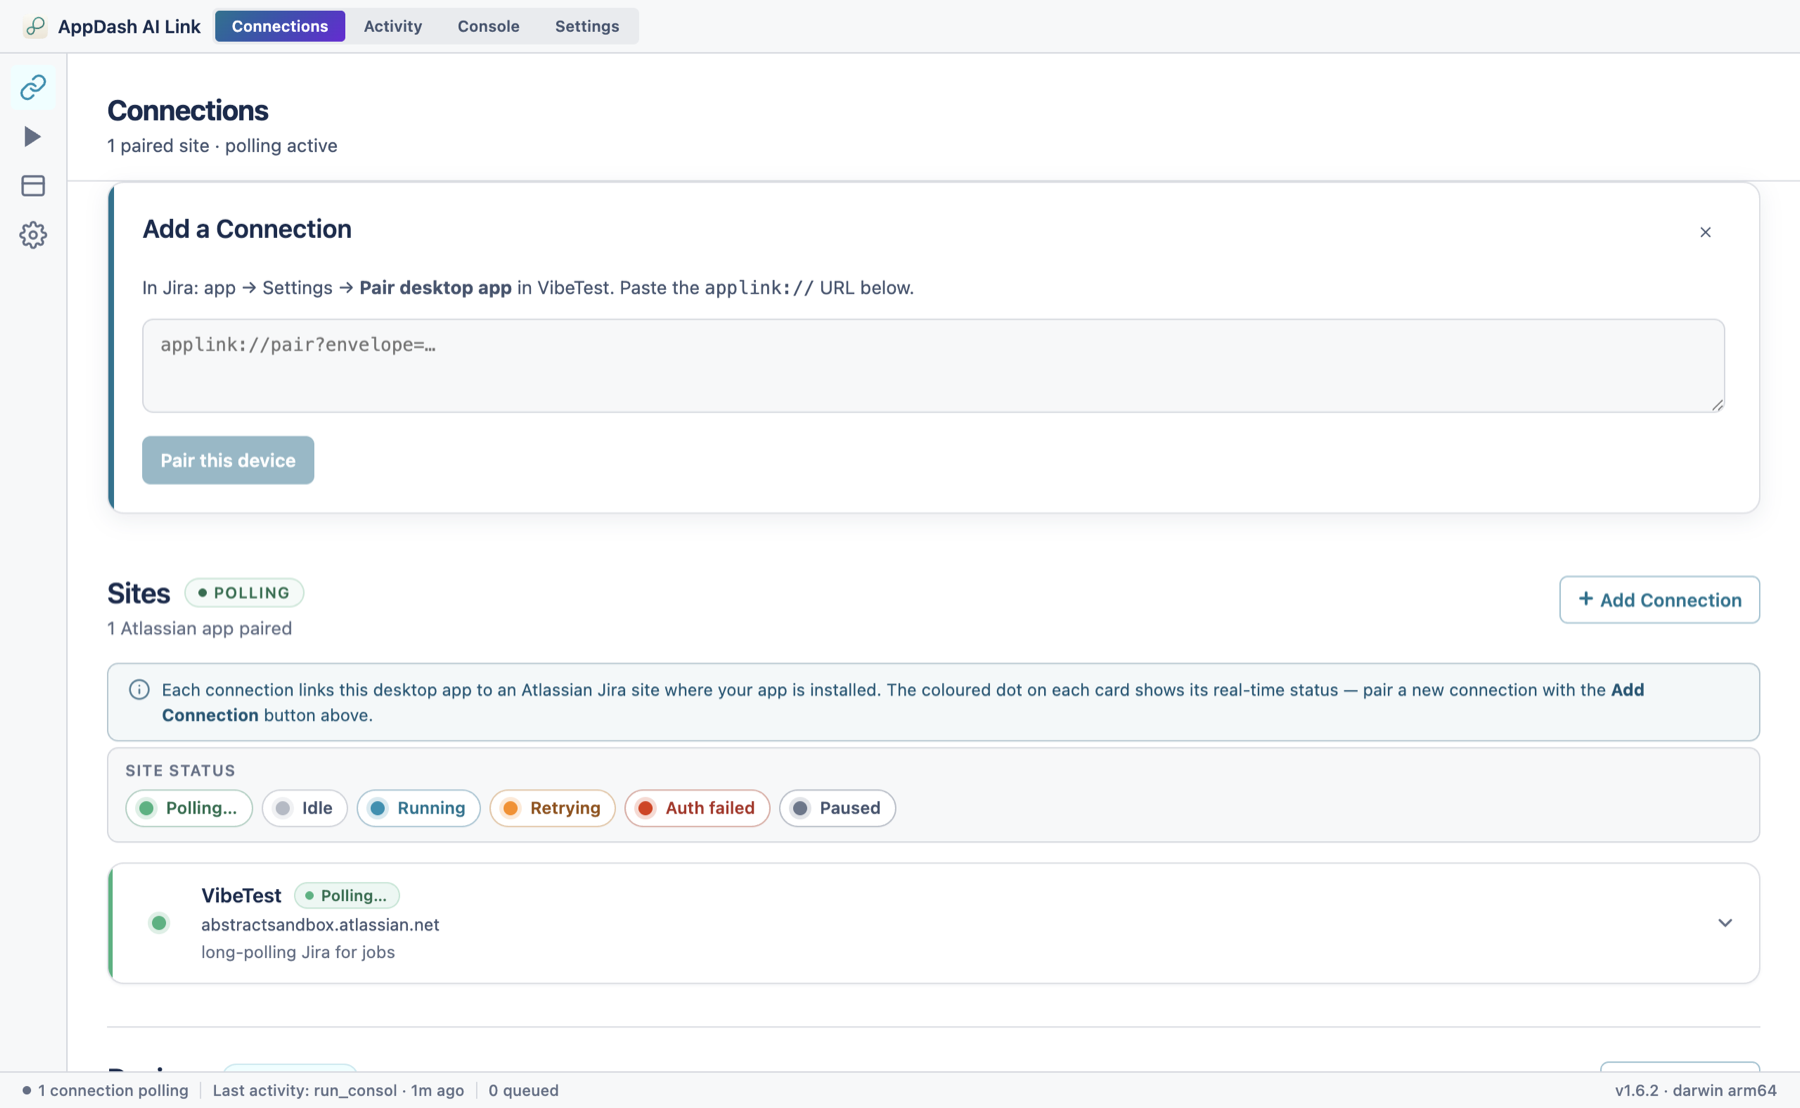
Add a Connection in the desktop app — paste the link Jira gave you, then click Pair this device. -
Check that the codes match.
The desktop now shows “Pairing in progress” with the same user code plus an app fingerprint. Confirm the user code matches the one Jira showed in step 2 — this is the security check that proves you're pairing the right machine.
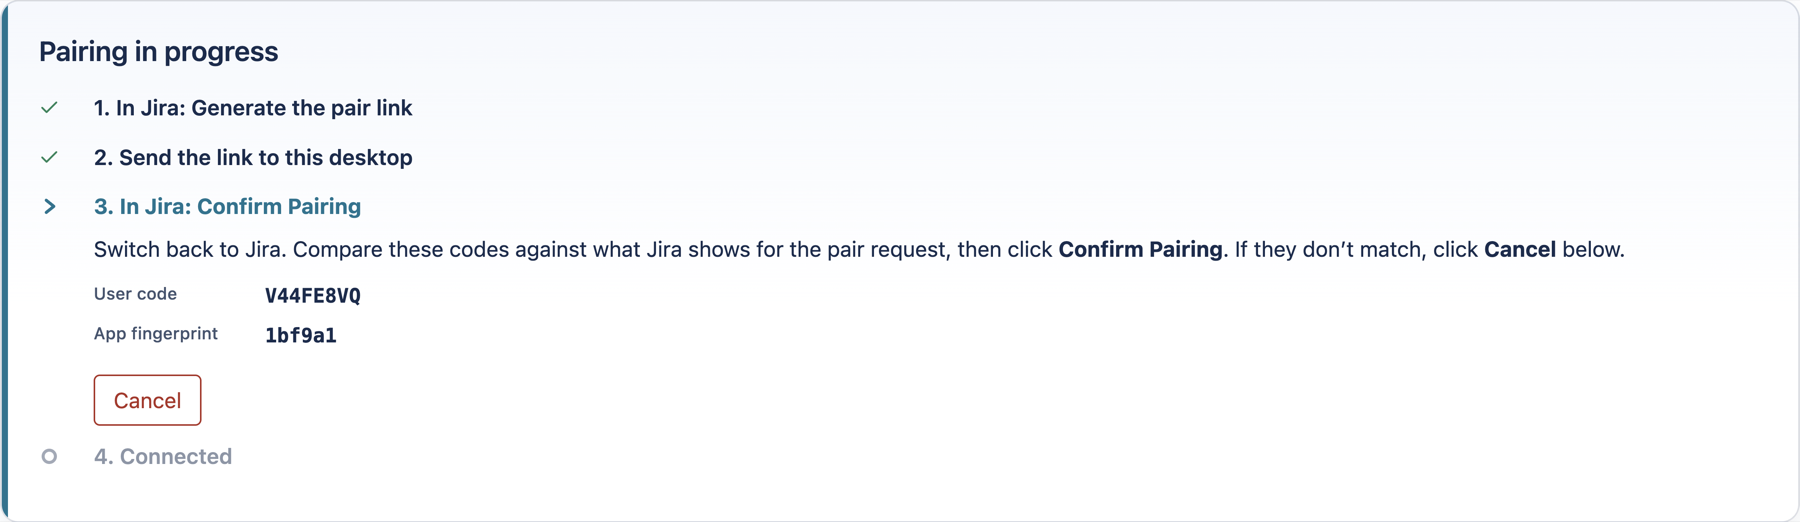
Pairing in progress. The desktop shows the matching code and asks you to confirm back in Jira. - Confirm in Jira — you're connected. Back on the Jira page, with the codes matching, click Confirm pairing. The tracker advances to Connected, and the desktop's Connections tab shows the new site under Sites with a green Polling dot. Your Mac is now listening for plan jobs from that site.
Back on the VibePlan settings page, the AI agent dropdown now lists the agent profiles on your paired Mac. Choose the one you want plans drafted with, and Save settings. From then on, Generate Plan on an issue runs through your own agent instead of Rovo.
Pairing links expire after a few minutes. If you see “The pairing code expired” or “signature invalid,” generate a fresh link in Jira and paste the new one. If a connection later shows Auth failed, just re-pair from Jira — see Troubleshooting.
9 Use the desktop app
Most of the time AppDash AI Link just runs quietly in your menu bar. When you want to check on it, its four tabs cover connections, generation history, low-level logs, and settings.
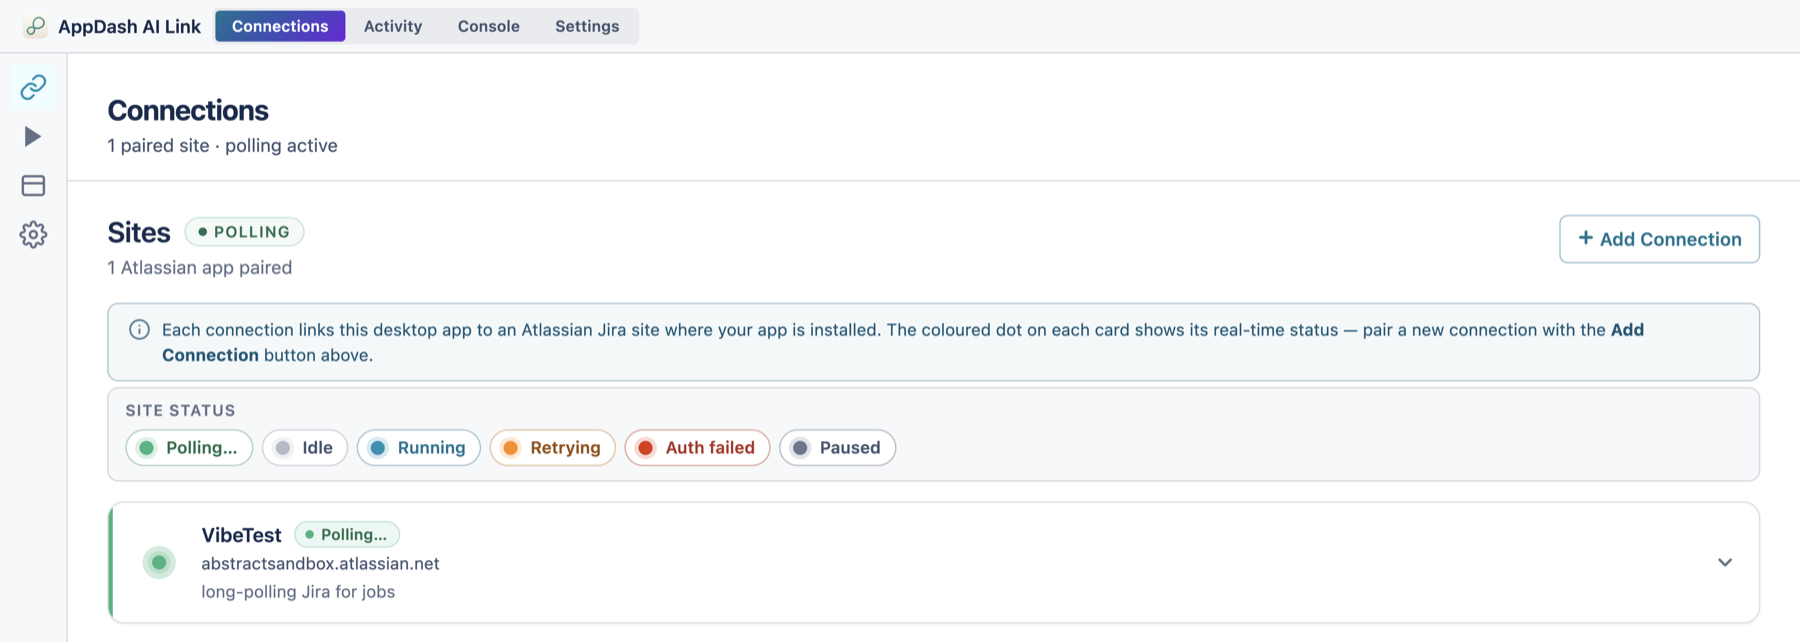
Connections — your paired sites
The Connections tab (shown in section 7) lists every paired Jira site under Sites, each as a card with a live status dot. Expand a card for its actions:
- Test — run a quick connectivity check against that site.
- Jobs — jump to the Activity tab filtered to this site.
- Network log — jump to the Console tab filtered to this site.
- Pause / Resume — temporarily stop (or restart) listening for that site.
- Remove — unpair the site and delete its locally stored tokens (this can't be undone — you'd re-pair to reconnect).
Activity — your generation history
The Activity tab is a searchable table of everything this Mac has run — including every plan it has drafted: when it started, its status, who triggered it, the issue, and how long it took (a Source column also appears once you have more than one connection). Click a row for the full detail, including the agent's transcript. While a generation is still in progress, open it and click Stop to cancel it — the plan is stopped and recorded as cancelled in Jira. Use Clear Log to empty the table.

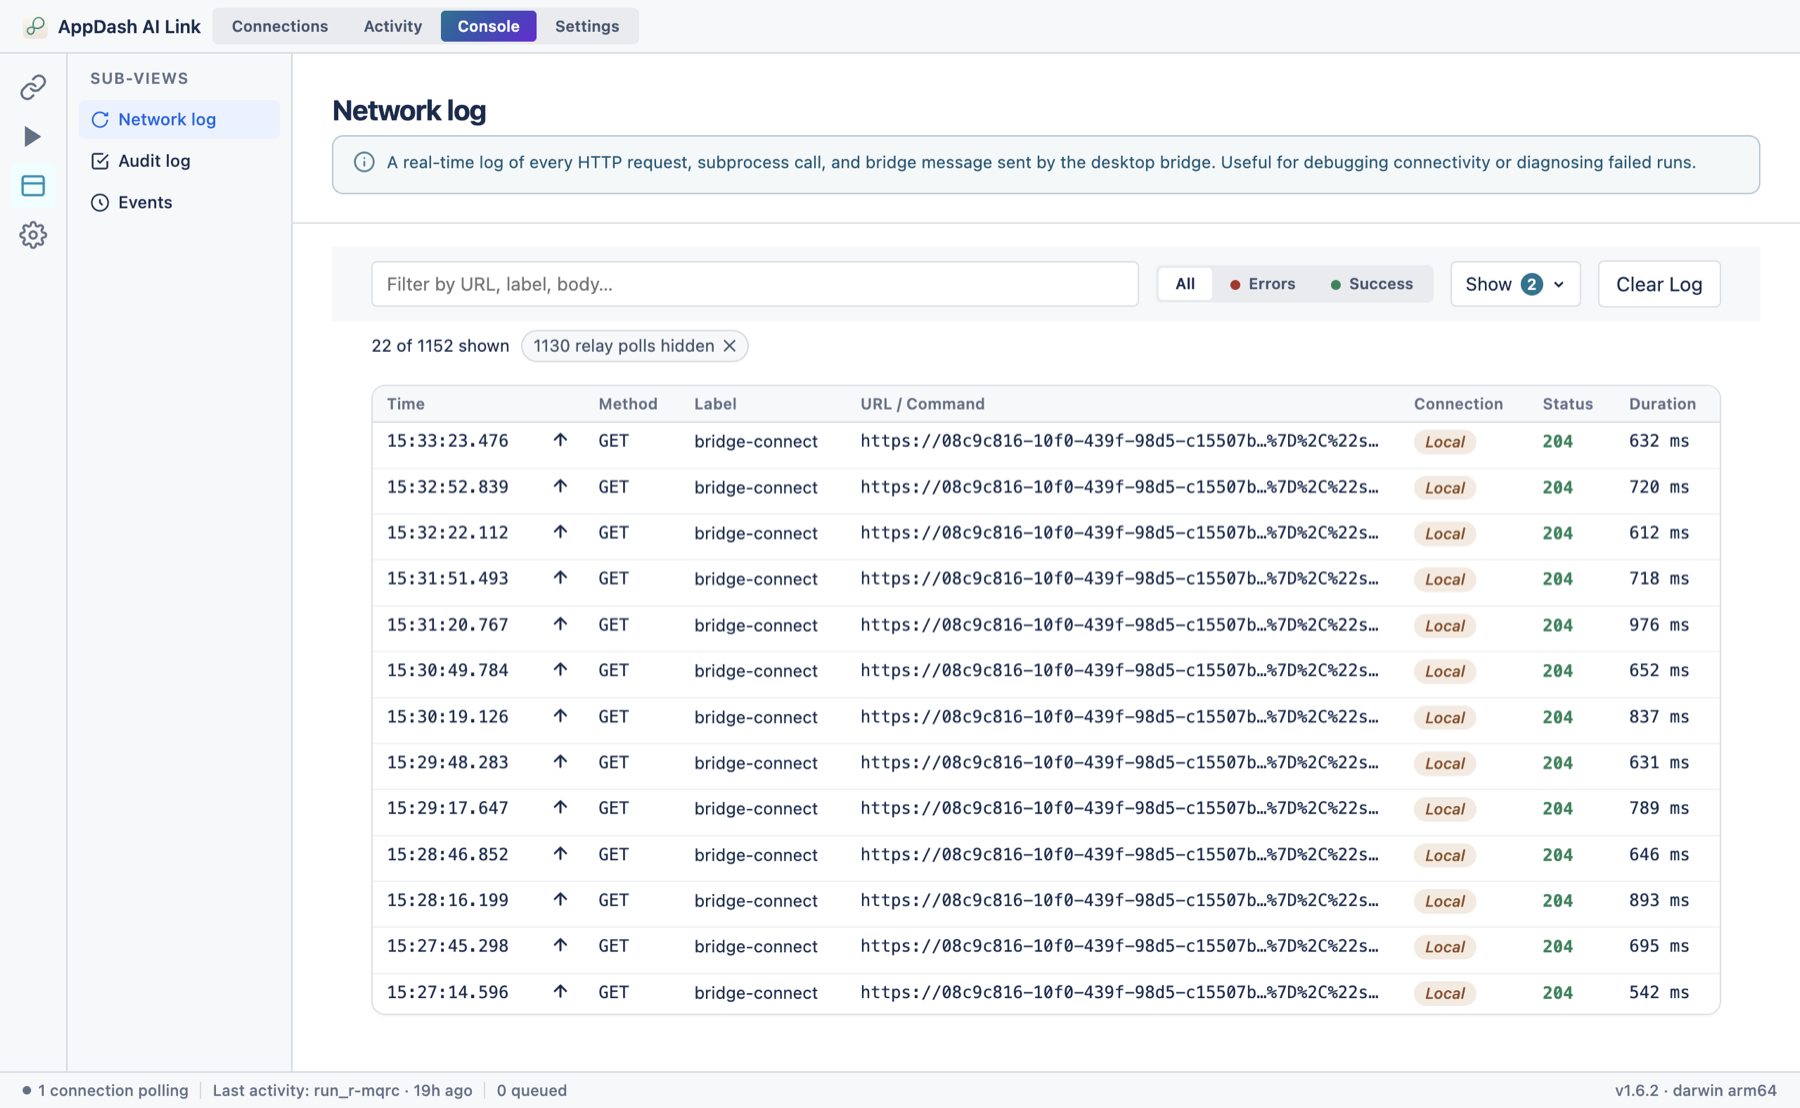
Console — the technical log
The Console tab is for diagnosing problems. It has three sub-views in a left list: Network log (the app's HTTP calls to Jira, agent subprocess launches, and pairing messages — colour-coded by success or error; routine background “heartbeat” polls are hidden by default, use the Show menu to reveal them; click a row to inspect the full request and response, or a job's launch to read its conversation), Audit log (the server-side security ledger for your Atlassian connections — pairings, token rotations, scope checks), and Events (a local record of actions on this Mac — pausing/resuming connections, settings changes, sleep/wake).
Settings — agents and preferences
The Settings tab opens on Agents, where you choose and configure the agent that drafts your plans.
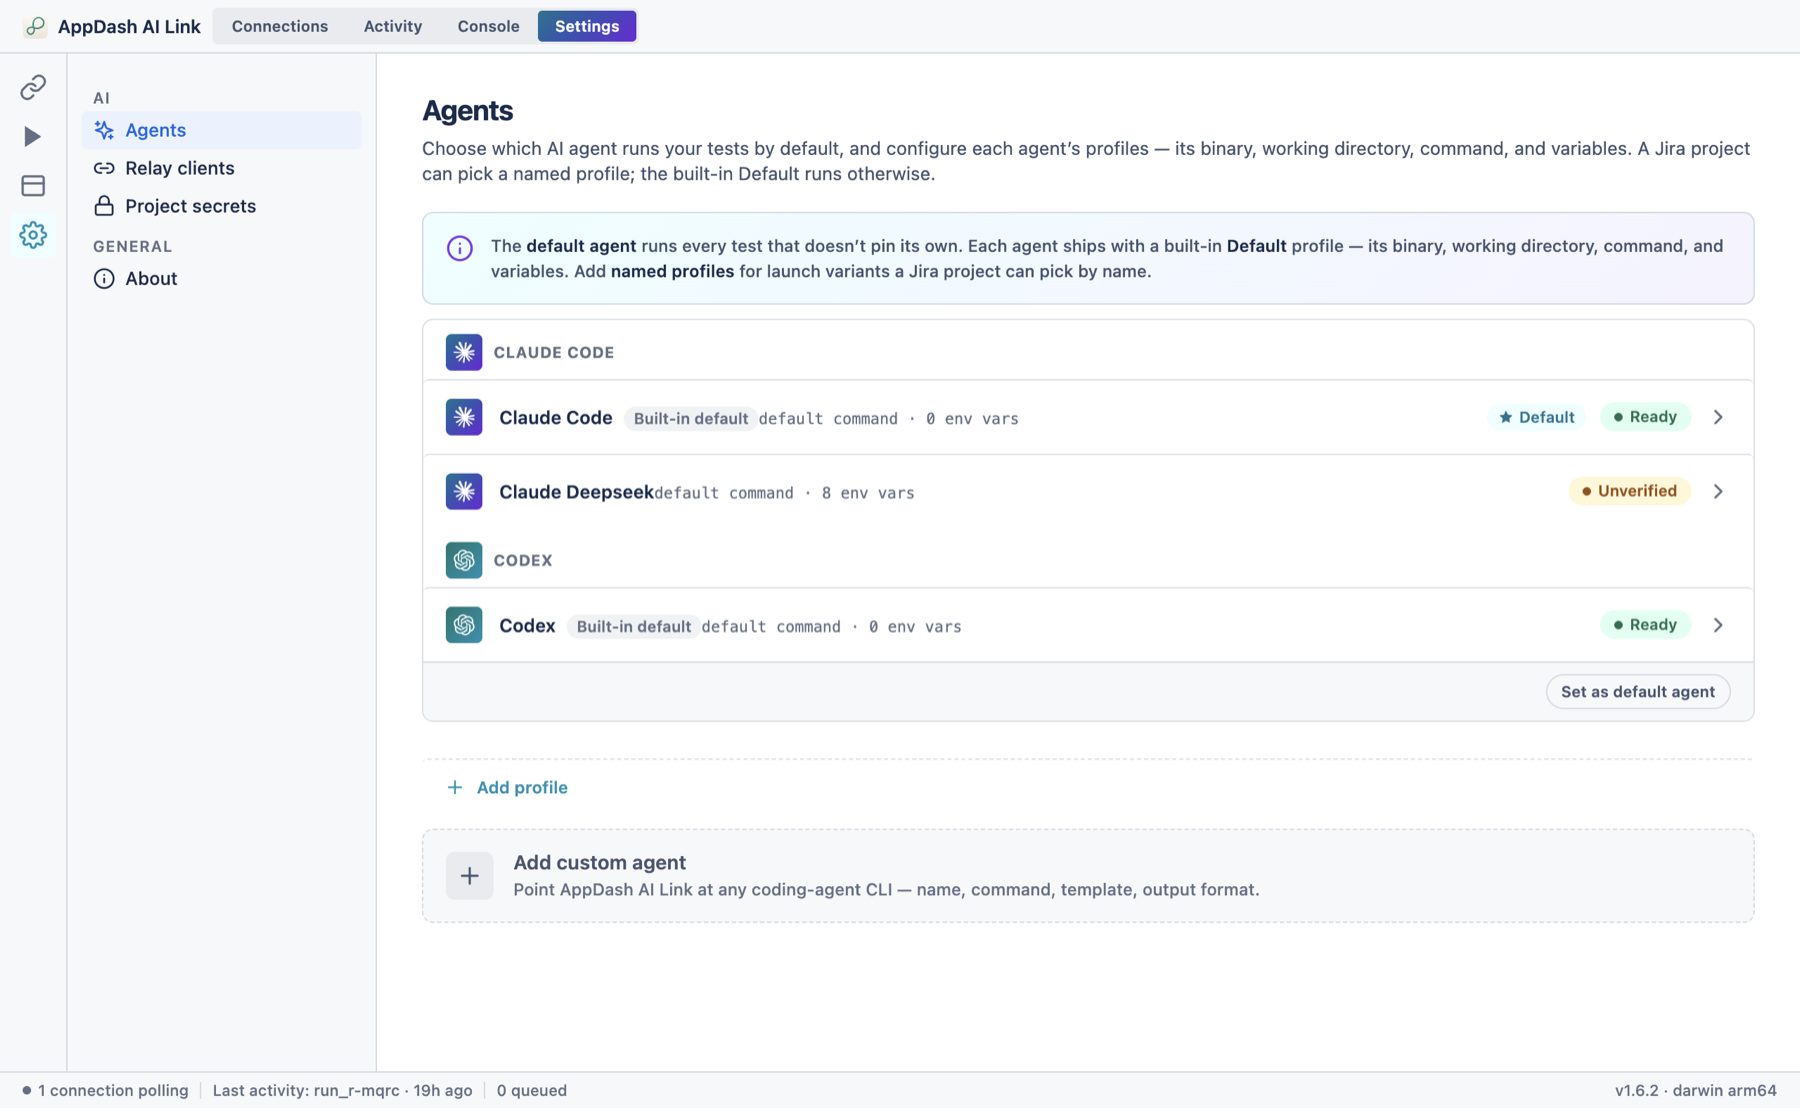
- Default agent — the agent used for any job that doesn't pin its own (Claude Code out of the box). Click Set as default agent on a healthy agent to switch.
- Profiles — each agent ships with a built-in Default profile and can have any number of named profiles. The VibePlan settings page in Jira pins a named profile by name; the Default runs otherwise.
- Add custom agent — point AppDash AI Link at any coding-agent CLI (name, command, output format, launch template).
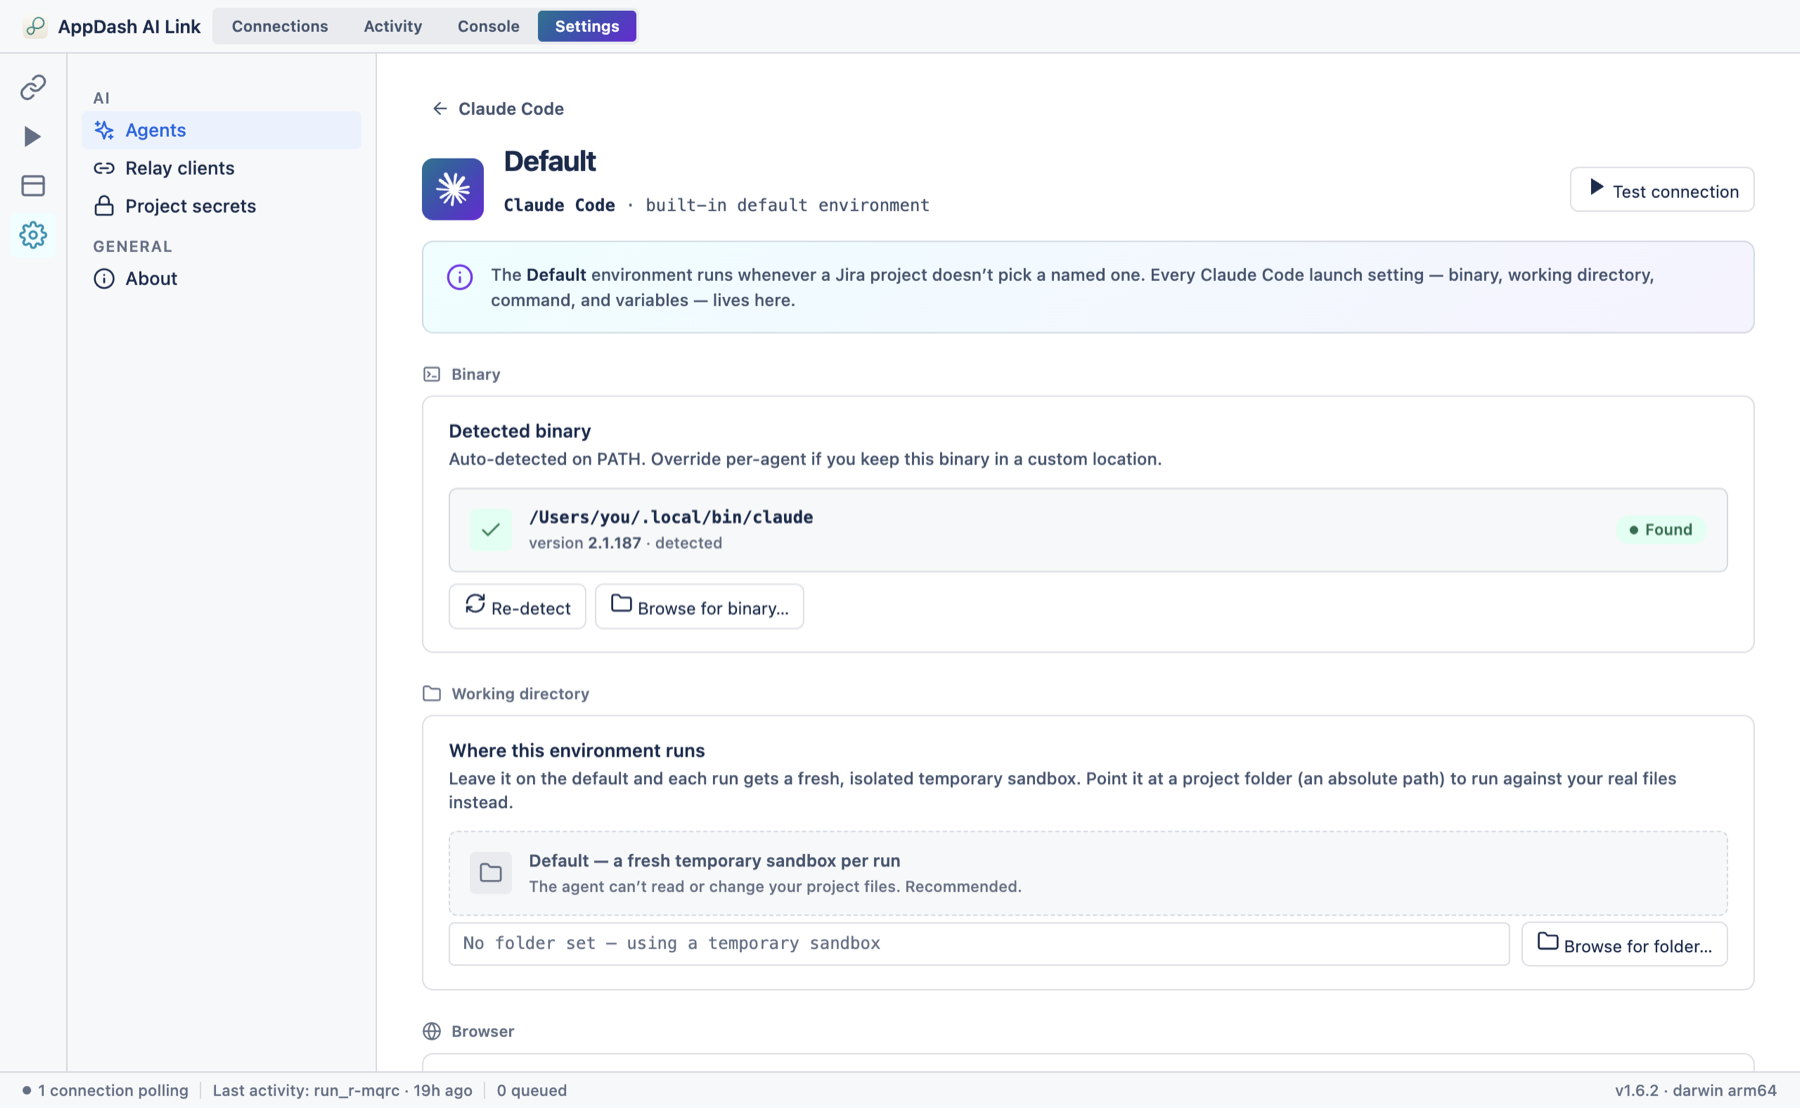
- Open a profile (the › arrow) to configure it: its binary (auto-detected, Re-detect, or Browse), an optional working directory (blank = a fresh sandbox each run; a real path lets the agent read your project files for a codebase-aware plan), the launch command template, per-profile environment variables (which can be marked secret), advanced timeouts, a live command preview, and a Test connection button.
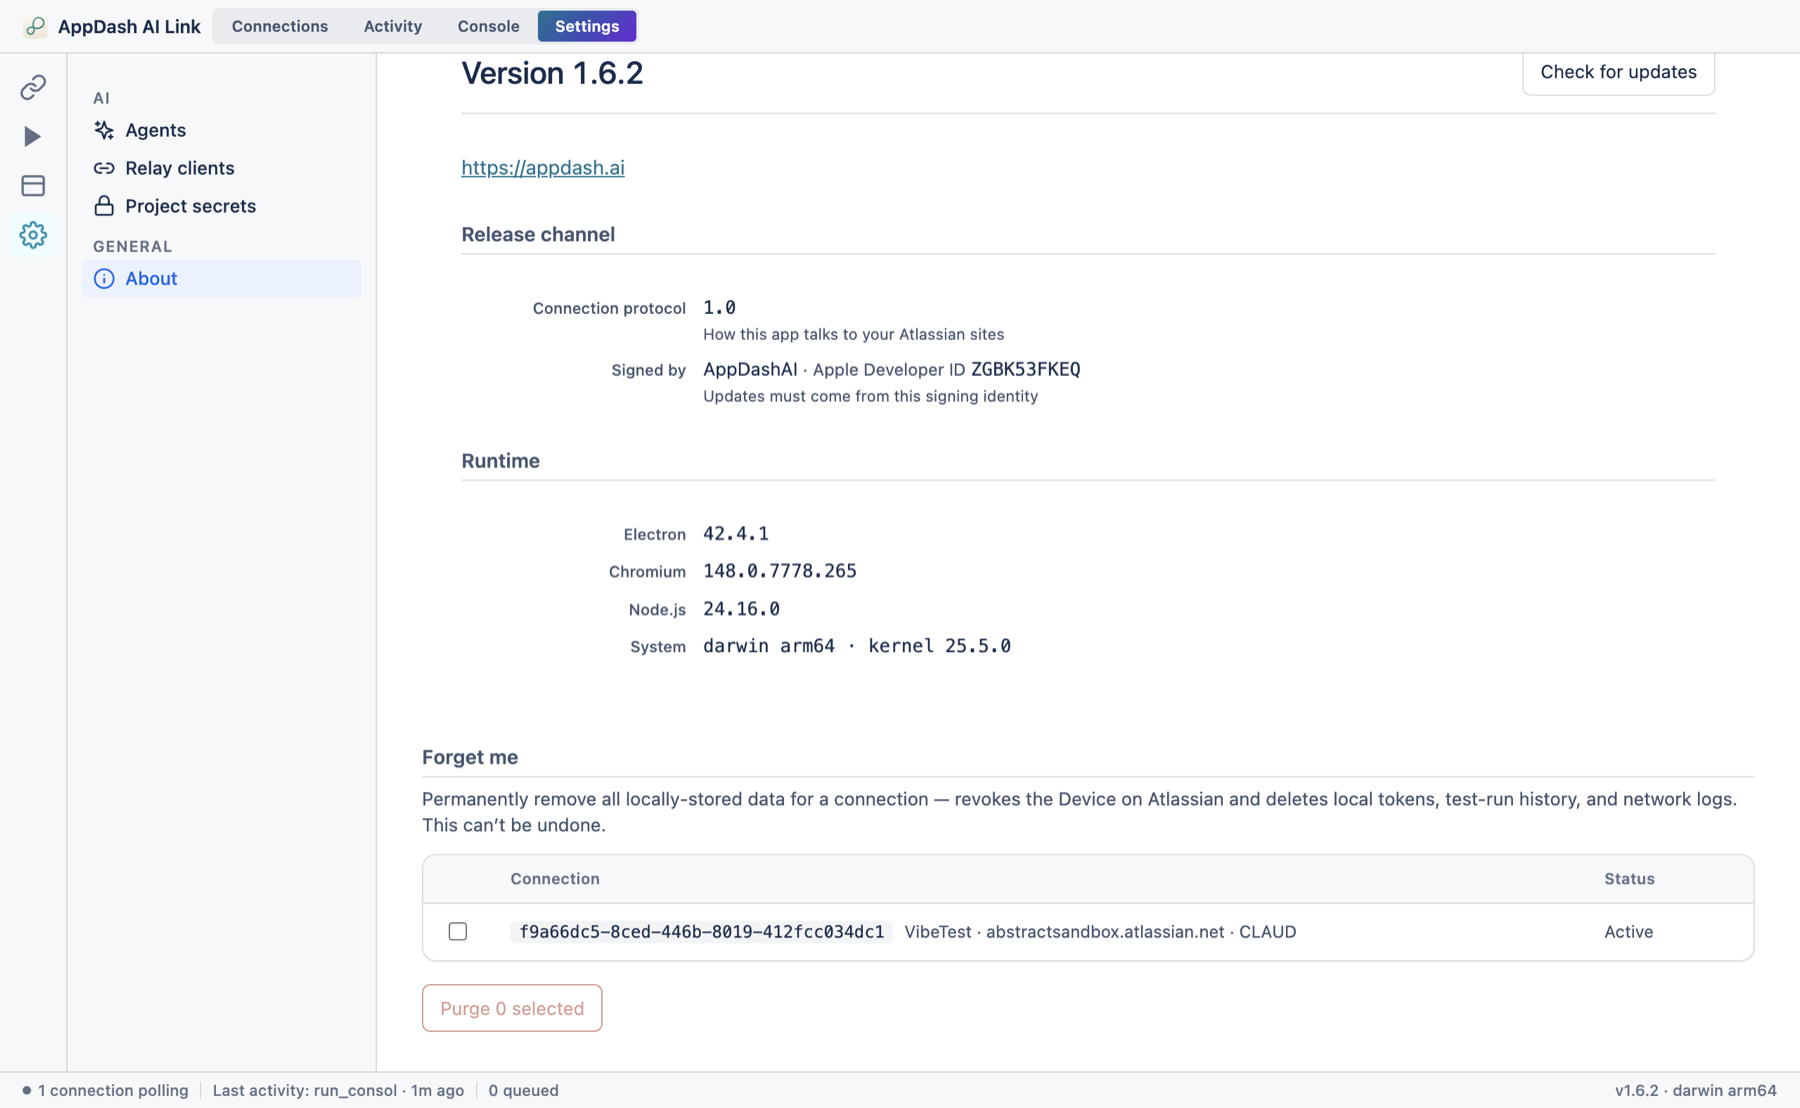
Other items in the Settings sidebar: Relay clients (pair an iPhone for read-only status checks — off by default), Project secrets (store API keys and credentials for your agent, kept write-only in your OS keychain), and About (version, update check, and the Forget me data-erasure wizard at the bottom).
By default the agent runs in a clean sandbox and plans from the issue text alone. Point a profile's working directory at a local checkout of the relevant repo, and the agent can read your actual code while drafting — turning a generic plan into one grounded in how your system really works.
10 Security & privacy
VibePlan is built so your most sensitive assets — source code, credentials, and customer data — stay under your control. This section summarises the architecture and controls a corporate security review typically asks about.
Where your data lives
There are only two places VibePlan keeps anything, and you own both — plus Confluence, where the finished plan lives as a page you control:
On the paired-desktop path, your data flows only between your Atlassian site and your own Mac. AppDash operates no backend that receives your code, credentials, or issue data — there is no third-party copy of your information to breach. On the no-desktop path, drafting is done by Atlassian's own Rovo AI inside your Atlassian platform — still no AppDash server in the path.
The two engines, and what each can see
| Engine | Where drafting runs | What it can access |
|---|---|---|
| Your AI agent (paired Mac) | On your own machine | The issue context, and — only if you set a working directory — your local project files. Nothing leaves your Mac except the finished plan. |
| Rovo AI (no desktop) | Atlassian's hosted AI, inside your Atlassian platform | The issue's summary and description only. No codebase access; governed by Atlassian's terms. |
Security controls at a glance
| Control area | How VibePlan handles it |
|---|---|
| Data residency | Plan records and settings are stored in Atlassian Cloud storage inside your own site; plan pages live in your Confluence; Rovo processing runs on Atlassian — all under Atlassian's data-residency controls. Desktop drafting happens on your Mac. |
| Data in transit | HTTPS/TLS everywhere — the Jira app's endpoints are TLS-only, and the desktop app reaches them over HTTPS. |
| Data at rest | Atlassian encrypts the stored app data at rest. On the desktop, access tokens and agent secrets are held in the macOS Keychain (OS-encrypted), not in plain files. |
| Third-party backend | None. The Jira app declares no general external-fetch egress — its only network paths are within Atlassian (Jira, Confluence, Rovo) and the bridge to your own paired Mac. |
| Authentication | Pairing is a mutual challenge–response with a time-limited code and an app fingerprint you confirm on both Jira and the desktop, so a connection is created only with your explicit approval on each side. Each job is authorized by a short-lived per-job token. |
| Confluence permissions | Plans are published as you (the person who pressed Generate), so VibePlan can only write to a space you can already edit. It never escalates beyond your own Confluence permissions. |
| Least privilege | The app requests a small, standard set of Jira and Confluence scopes (listed below) and nothing more. The authoritative list is shown to your admin at install/consent. |
| Network exposure | The desktop app is outbound-only — it polls your Jira site over HTTPS. It needs no inbound ports, port-forwarding, or firewall changes. |
| Source & credential isolation | On the desktop path, your repository, environment, and agent API keys stay on your Mac and are never sent to Jira or AppDash. Jira receives only the drafted plan text and the two effort numbers. |
| Revocation & erasure | Unpair a site to delete its local tokens, revoke a connection from Jira, or use Settings → About → Forget me to wipe all locally stored data at once. |
| Software integrity | The macOS app is code-signed and notarised by Apple, and updates are delivered through a signed auto-update feed. A minimum-version gate retires outdated clients from the bridge. |
Atlassian permissions (scopes) the app requests
VibePlan asks for only what it needs to read the issue, publish the plan to Confluence, write the effort fields, and store its own data:
| Scope | Why it's needed |
|---|---|
read:jira-work | Read the issue's summary, description, and linked context to draft the plan. |
write:jira-work | Add the link back to the plan page on the issue. |
write:app-data:jira | Write the two effort estimates onto the issue's app-managed fields. |
read:jira-user · read:me | Resolve the display name of whoever generated a plan, for attribution. |
storage:app | Store the app's own data (plan records, settings, pairings) in Atlassian Cloud storage. |
write:page:confluence · read:page:confluence | Publish the plan page and read it back (for in-place regeneration). |
read:space:confluence | List the spaces you can publish into, for the settings dropdown. |
read:comment:confluence | Read the page's comments so regeneration can incorporate your feedback. |
report:personal-data | Report the account IDs the app stores to Atlassian's privacy service, so deletion requests are honoured (a Marketplace GDPR requirement). It enables no external network access. |
The Jira and Confluence side run on Atlassian's hosted runtime
The Atlassian side of VibePlan — the panels, resolvers, storage, and the Rovo AI drafting path — runs entirely inside Atlassian's hosted, sandboxed runtime, with per-tenant data isolation and Atlassian-managed encryption. (When you draft with your own agent, that execution happens on your Mac, not on Atlassian.) For Atlassian's platform certifications, sub-processors, and data-residency options, point your reviewers to the Atlassian Trust Center and the app's Marketplace listing.
Most reviews are satisfied by four facts from this page: (1) the data-flow diagram above — data stays between your Atlassian site and (on the desktop path) your Mac; (2) the app requests only the scopes listed and no admin scopes; (3) there is no third-party backend and no general external-fetch permission; and (4) plans publish as you, only where you can already write. Pair that with the Atlassian Trust Center for the underlying platform.
Your responsibilities
- Protect the Mac. Anyone with access to a paired Mac can generate plans against the connected site. Use full-disk encryption (FileVault) and a screen lock.
- Mind the working directory. If you point a profile at a local repo for codebase-aware plans, the agent reads that code while drafting. Use a checkout you're comfortable handing to your agent.
- Review before relying. Plans are AI drafts. Read them — especially effort estimates and any risk notes — before treating them as commitments.
11 Troubleshooting
Most issues come down to the Confluence space, a connection that needs attention, or the desktop app not running. Start with the panel's own message — it usually tells you exactly what to fix.
Common problems
| Symptom | Likely cause & fix |
|---|---|
| Generate Plan is disabled | No Confluence space is configured for the project. Open Project settings → VibePlan and pick a space (section 3). |
| Plan failed: “no AI agent ready” | A Mac is expected but the selected agent profile isn't available on any paired device. Open settings and pick an available profile, or pair a desktop that has one — or remove the device to fall back to Rovo. |
| Plan ready but “couldn't publish it” (permission) | You don't have add-page permission on the selected space. Pick a space you can edit, or ask a space admin for access, then Try again. |
| Plan ready but “space wasn't found” | The configured space was deleted or you lost access. Choose a different space in settings. |
| Plan ready but “publishing failed” | A transient error. Try again in a moment; if it persists, re-check the space in settings. |
| Generation never starts (stays Queued) | On the desktop path, the app may be quit or the connection paused. Open AppDash AI Link, confirm the site shows Polling, and Resume if it's paused. (Rovo plans don't need a desktop.) |
| Connection shows Auth failed | The stored tokens expired or were revoked. Re-pair the site from Jira (section 8). |
Connection statuses and what to do
| Status | What it means | What to do |
|---|---|---|
| Polling | Healthy — listening to Jira for plan jobs. | Nothing. This is the normal state. |
| Idle | Registered but not actively polling right now. | Nothing; jobs still arrive within seconds. |
| Running | A plan is being drafted on your Mac right now. | Wait for it to finish. |
| Retrying | A temporary network or server hiccup; it will retry automatically. | Usually self-heals. If it persists, check your internet. |
| Auth failed | The stored access tokens expired or were revoked. | Re-pair the site from Jira (use the Re-pair button on the card). |
| Paused | You paused polling for this site. | Click Resume on the card. |
| Update required | The desktop app is too old for the current bridge. | Update AppDash AI Link (Settings → About → Check for updates). |
Check the wiring: Test connection
To confirm your Mac can reach the AI agent, open Settings → Agents, select your agent profile, and click Test connection. It runs a tiny PONG prompt through the agent's full launch path. A “Ready ✓” result (with the round-trip time) means the desktop-to-agent link works; a “Failed” result points at an agent that isn't installed or configured — re-check the profile's command and binary path on the same screen.

Privacy: erase everything
Everything the desktop app stores on your Mac — connections, tokens, activity, and logs — lives there, not in the cloud. To wipe it all, open Settings → About → Forget me and confirm. This permanently deletes the local data and unpairs your sites.
For the no-desktop path, confirm a Confluence space is set and you can add pages to it. For the desktop path, confirm the app is open, the site shows Polling, the Test connection check passes, and your AI agent is installed. The Console tab and Settings → About (for the version) are the details to share if you report a problem.